A few years ago, there was a Cloudy Nights thread about a mysterious large refractor which came up for sale on Craigslist in Connecticut. An amateur astronomer and variable star observer had a large telescope in a large dome attached to his house. At some point in the mid 2000s the house sold, and the new owner built in walls and a ceiling around the telescope to use it as a regular room. Around 2013 the house sold again, and the new owner wanted to sell the telescope and listed it on Craigslist. Eventually some party bought the OTA. It seems the mount and much of the scope's accessories were scrapped.

Around 2021 the OTA was offered to the Westport Astronomical Society as a donation, but they rejected it as they had no place to mount or use it. It was eventually acquired through trade by Zane Landers, an ambitious young observer and telescope builder. Zane's original description is a little off -- it is 8.25" clear aperture, though the edges of the objective glass are covered by the cell's mounting rings, so the glass is actually 8.437" diameter. There is written evidence from Dalton on the AAVSO website that he always intended the objective to be 8.25-inches, so he understood the cell would overlap the edge of the glass. The focal ratio / length was estimated (Zane estimated it at 125"). The OTA had been stripped of its counterweights, finders, and ship's wheel by the time Zane acquired it.
Because Zane was moving to the southwest and with no means to mount or use it there, he decided he could not keep the scope. He sold the Unitron focuser (which caused confusion among people on Cloudy Nights -- the scope was not made by Unitron, only the focuser was). He sold the objective to Steve McDaniel of Florida. The 10" diameter tube remained in Zane's parents' garage in Connecticut.


In 2023 Steve decided to sell the objective, no doubt because of the substantial effort needed to make the OTA (finding the tube, getting the correct length, painting, baffling, fabricating a flange for the focuser etc.), not to mention requiring a large equatorial to mount it. I often think optics are only 1/3rd of the difficulty and importance in a telescope -- another third is for the OTA, and the remainder for the mount. In any case Steve put it up for auction on Astromart, and I bid. I was motivated by my double star observing, which I do from my back yard (I had a place to mount it), squeezing out as much resolving power as I could from a refractor. I am very pleased with the 6-inch f/15 refractor I assembled and mounted in my backyard as my pandemic project. It has been my most used scope: solar observing during the day, and doubles, moon, and planets at night when seeing doesn't justify opening up the 20-inch's roll-off shed. The contrast is wonderful, star images clean, and it feels like it punches above its aperture. Having gone through the effort to buy the parts and assemble the 6-inch, I felt I could do the same with the larger objective, which would hopefully perform even better than the 6-inch. The bids did not meet the seller's reserve, so Steve posted it again, and I bid again. Without meeting the reserve a second time, the auction ended without sale. But since I had shown the most interest, Steve reached out to me to see if we could make a deal. I knew from Zane what he sold it to Steve for, and I paid the same amount, plus shipping cost from Florida to California.

So now it was mine. First was to verify the focal length. Using a bright flashlight and the longest stretch of my house indoors, I used the Bessel method to find the focal length, which I calculated as 128.8 inches. This gave me an idea of the tube length I would need. The measurements of the cell determined the wall thickness (0.125").


My second worry was how to mount it. I use a Byers 812 for the 6-inch, but I worried the 8.25-inch would weigh more and have a greater moment arm. I so I posted a want ad on my local astronomy email group (TAC), asking if anyone had a big mount they would give away for free. To my surprise someone did respond, Dr. Yuen So said he had an observatory in the Carmel Valley with an old (circa 1970s) Cave-type 2.5" shaft equatorial, which I could have free if I came down and disassembled it from the pier in his observatory dome. What a generous offer! In September 2023 I traveled down to the site, which was once called the Tularcitos Observatory and has a 16 1/2 ft Ash dome. The OTA was an 18-inch Newtonian in a 21” diameter fiberglass tube. The mount is seen here on its 8-inch pier, which is mounted to a 3'x3' concrete pier from the second-story observatory down into bedrock. I had to separate the altitude and declination components (each weigh ~60 pounds) so I could carry it down the observatory stairs to my car. There were three 50-lb threaded counterweights too. I spent the night observing with Yuen, and he and his wife treated me with great hospitality.

Confident I now had a mount which could carry the refractor, I proceeded to look for a tube. This turned out to be more difficult than I expected. I could find tubes online (e.g. Hastings Irrigation) but the standard wall thickness was too thin to fit the cell, and the LTL freight costs were >$800. I called several irrigation companies in Salinas and the Central Valley, but they did not have stock and they would not order for a 1-off job. Fortunately, Zane still had the original aluminum tube at his parents' house, and he graciously offered it to me for free. I searched around for cross-country small load shippers, people who move furniture and artwork and such, and found the UShip website. I put up my bid and was surprised to have offers to move the tube for <$400. So, in January 2024 the tube was picked up, loaded in a 14' trailer, and moved across the country. I needed to be flexible as to the pick-up and delivery times, since such carriers' schedules are unpredictable. But the tube arrived in good shape in early February 2024, and I could then begin the work to assemble the scope.
Because no one has looked through the objective in at least 20 years, there is no record of its optical quality. So, I took a big risk with this project. My plan was to assemble the OTA as a finished build and then mount it to my Byers just so I could confirm it was a good objective. If the optical quality was good, and if the Byers could carry the load, my project would be finished. If the Byers couldn't carry the load, and if the 8.25-inch was of sufficient quality, I would tear down the Byers and mount the 2.5" equatorial. That would be a big job indeed: I'd need to find a pier junction, build another pier, add encoders to it, polar align it, and troubleshoot the tracking issues Yuen told me about). During March - April 2024 I set about recovering the scope.
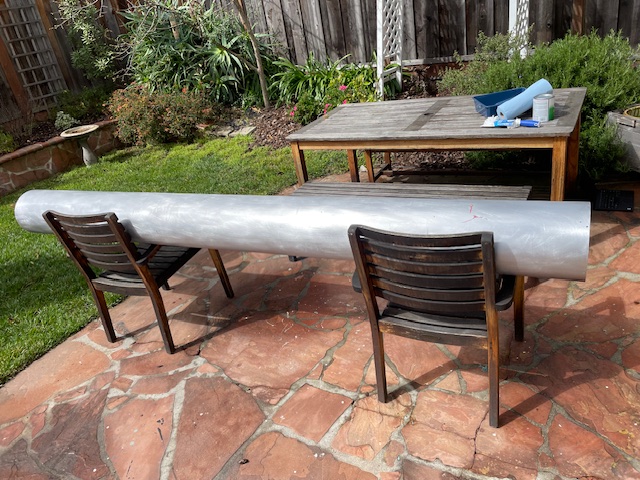
Here's the tube as received, with some long scratch marks and large sections of paint missing:

I stripped the tube of paint using a chemical stripper. There were numerous drill holes in the tube, some of which I saved for my final version of the scope. I did a test-fit of all the hardware I would mount on the scope: the finder scope rings, front and rear counterweight rails (which are made with T-slot rails), Telrad, an eyebolt to help tie the scope to the tripod when not in use, and even brackets to hold a 12" diameter handwheel at the eye-end, which should make steering the scope much easier. In the end there were around 15 holes which needed to be filled with Bondo glass-fill. This done, I sanded with 60-grit to level the Bondo and remaining flecks of paint, then 220-grit to prepare for painting:
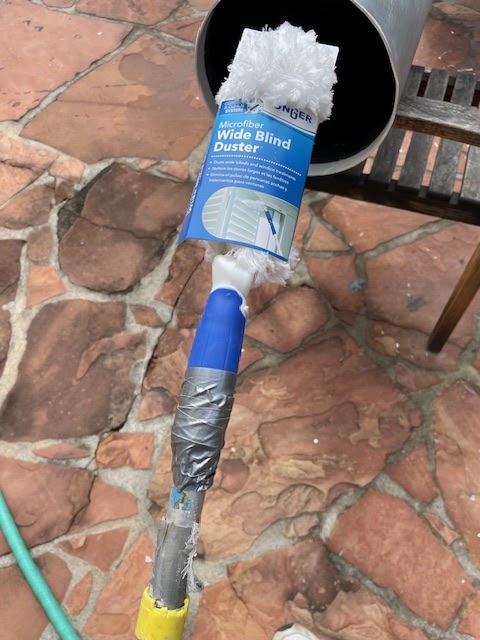
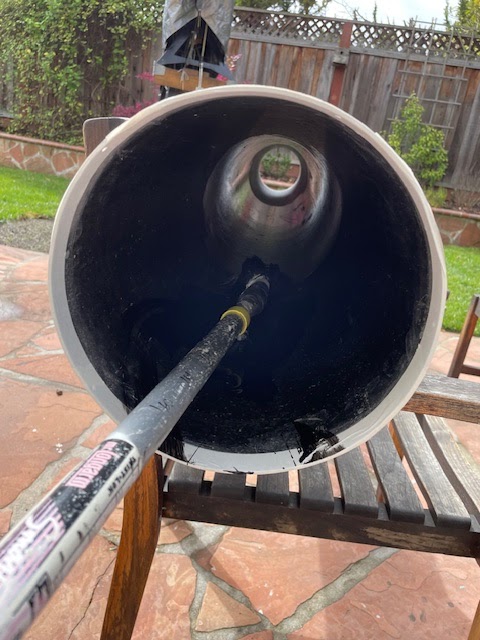
Painting the inside of the tube was unnecessary, but I did it anyway because it was a convenient time in the restoration to do it. To get paint into the tube I used a dusting tool which I found at the hardware store. It had sponge-like microfiber tips to absorb paint, and it could be attached to a pole. It worked out really well and took little time. There were three press-fit baffles in the tube, which had come dislodged during the tube's travels -- I painted those too. I used black chalkboard paint.

I used three cans of gloss white spray paint on the outside of the tube, and finished it with rubbing compound, which really made a nice difference in the final appearance.


I made a life-size ray trace of the optical path using a roll of painter's masking paper. I found that two baffles were sufficient to block any stray light, but since there were three included with the tube, I mounted all of them, following the spacing called out according to the ray-trace. I was worried the thin aluminum sheets might pop out of place over time, so I used small self-tapping screws at three points around each baffle, in front and behind of each baffle, to make sure they would not pop out and block the view. I do not want to take the telescope apart just because of a popped baffle. I put a sheet of Protostar flockboard between the objective and first baffle, just for the extra scattered light control.


While the objective was relatively clean, there were a few small fungus growths in between the crown and flint, so I decided to clean it. There are some small clamshells around the perimeter of the objective, but they are covered by a 1/8" wide mounting ring. Clamshells might have caused strain in the glass; I tried looking at it through polarized light but saw nothing (assuming I performed the test correctly, sunglasses in front of a computer screen). I was worried about damaging or somehow messing it up if I removed the elements from the cell. As far as I can tell the glass is not coated.
I removed the glass from the cell and found no pieces of glass. Some of the chips were filled with red nail polish! Probably Dalton's wife's. The chips must have all occurred during grinding. I marked the order of the radii and set them in a bath of soapy water and hydrogen peroxide to kill any fungus, of which there were a few very small dendrite growths which did not etch the glass. After cleaning the cell and painting it, I reinstalled the cleaned objective, having filled the chips with some black paint. The crown went back in no problem, but the flint fought me and would get stuck on the way down. I used a bit of force to rock the flint down the walls of the cell, eventually finding the resting places along the spacers. I measured the edge of the flint at different points to the end of the cell, to make sure it was still flat. I reinstalled the retaining ring and was done.
The objective went back into the tube more easily than I thought it would, but I did use some white lithium grease along the tube end so in case I ever had to remove it. I managed to line up all the tapped holes in the cell with their corresponding holes in the tube, and I used 1/8th inch setscrews to hold it in place.


I next installed the steering wheel, cut from a cast aluminum hand wheel and mounted using screws and brackets. I fitted it to the tube using the same holes Dalton used for his steering wheel. Then I mounted the tail piece and Moonlight focuser. I had sent the tail piece to Moonlite when I ordered a custom flange, and they anodized it the same time the anodized the flange. To align the focuser, I had to unscrew the flange connection and move it by hand, using washers as shims to get the angle right. I used a paper target mask taped in front of the objective and set a mirror in front of it so I could see where the laser point was on the mask while I worked at the tailpiece to set the alignment.


Next was weight and balance. Total weight of just the telescope with objective and focuser is 62 pounds. Add the rings and finder, it is around 75 pounds. I carefully balanced the scope and marked the center of gravity with some tape. I then mounted the rings on the Byers 812, careful to balance it too (it needed a small weight toward the rear of the Losmandy rail).

I took down the 6-inch f/15 (sad to do so, it's a fine scope) and took the opportunity to take a family portrait, of sorts, of all my f/15 scopes: 60mm, 80mm, 6-inch, 8-inch. The 6-inch is light and manageable compared to the 8-inch! The 6-inch is now in the garage, but I'm thinking to restore it and bring it to star parties, and maybe use it as a solar scope, with the light fed from a flat.

I thought I would need a second person to help me put the Dalton onto my mount, as the rings are a good 8' off the ground. But I just decided to just do it myself. I set my ladder on the south side of the mount, and the rings parallel to the ground with the clutch locked, cradled the scope in my arms, and slowly walked up the ladder. When I was level with the rings I set it down, lining up the tape I used to mark center of gravity of the scope and the rotation axis of the mount. With the scope's weight resting on the bottom rings and holding it down with one hand, I reached over and brought the top ring down and tightened it, then the second. I tied a rope to the eyebolt at the focuser end and to the bottom of my wood stand so it would not rotate uncontrolled. The scope would not balance in RA with the weights I had on hand. I ended up buying 40 pounds of barbell weights and attached them (with a spacer to fill the 10mm gap between the Olympic weights and the 812's threaded counterweight shaft) to the counterweight shaft, retaining the Byers threaded weight at the end, so I would be able to adjust balance as needed. After a few tries I was able to find balance in different configurations.
5/1/2024: My first light was on the sun. I first used the Baader wedge and was able to reach focus after adding a 2" extension tube to the focuser drawtube. I could focus, but the image was blurry, which I blamed on the poor seeing. That night I was able to star test, on Arcturus and a nearby less bright star. I was concerned! The star test showed a severe coma problem, looked almost wedge-shaped. I fretted about whether I had wedged the flint when trying to put it back in the cell, and now it was pinched. But a couple days later I was able to try to re-square the focuser, and I found that the focuser was not centering on the objective. It's not easy to work on the scope when it's mounted, using ladders on either end, but with a sight-tube and a laser I was able to get the focuser reasonably well centered. I need to wait a couple more nights for it to be clear to star test again, and I very much hope centering is the only problem.

5/7/2024: I spent time centering the focuser. I added some bolts to available holes to provide for some crude collimation -- the Moonlite focusers are collimated to their flanges, but only when the focuser is off the scope, with screws accessible on the inside of the focuser only. It's not possible, without my modification, to collimate when it's installed on the scope. It's not a good design and I am disappointed! But I made do and centered it pretty well. But that night I still had the poor, wedged shaped star test. I began to wonder if the flint was wedged -- but the star test looks exactly like coma, so I do think it's only alignment -- this time of the objective and cell. Will try again in a few days.
5/10/2024: I spent time on the scope again this morning, hoping all I needed was to adjust alignment to get the coma out. I refined the focuser alignment to be dead center. I used a different Cheshire this time, without any crosshairs, and immediately saw two widely spaced circles -- obvious cell misalignment. With the scope parallel to the ground, I went back and forth: from one ladder in front of the scope to adjust the position of the cell in the tube, then to the focuser end to have a look at the Cheshire. I made slow progress, and sometimes moved the cell so the circles were wider apart, but after a half hour (with the sun getting more intense), I was able to position the cell so the circles appeared single. Fortunately, Dalton made the holes in the tube through which the screws would go slotted, so that the cell could be adjusted in the tube. I tightened down the screws and moved the scope around to make sure it would hold. It seemed to be ok.
I proceeded to observe the sun, first using the Baader wedge at full aperture. The view was very impressive. When seeing was stable the image was sharp. There is a very large and very complete sunspot group on the sun now, and it was quite amazing how much turmoil I could see. Interesting spots in other parts of the sun, including a group of pores in a grid pattern. Faculae extended to well into the solar disk -- I'm not sure if because of aperture and resolution, or if the sun is just especially active. Seeing proved too much for full aperture (and I could feel the heat coming off the wedge), so I taped my rough 4-inch mask to the cell. I viewed for a long while, it was so good. Then I put on the Quark to view in H-alpha, and there was a very large, turbulent prominence rising up like a forest fire and bending into a huge bow. There were small surge proms in front of it. I could see the distinct hacksaw blade like chromosphere. Many other interesting proms around, including a rectangular structure which had a long, broken ribbon coming off of it, the outer puffs of which seemed to float away. They faded pretty quickly, and I wonder if it was a take-off prom.
But that night I pointed the scope at Spica, and I saw the same wedge-shaped star test, though a little improved. The Cheshire confirmed the alignment is ok. So, it must be a wedged flint. I did notice two slightly flattened portions along the perimeter, which points to pinched optics. On the bright side, if the solar viewing today was so good with a maladjusted objective, it must be very good when properly mounted.
----
Rest of May: I removed the objective from the cell but I needed to boil the objective in a large pot of water to remove the flint, which was stuck. This told me the cell was just not large enough to properly fit the elements. I was relieved to get the elements out. I proceeded to sand down the inside diameter of the cell using a 60 grit flap wheel attached to my hand drill. This removed around 1/16th of an inch of material, enough to allow the elements to easily slide into place. I sanded the inside surface with 220 and then 400 grit sandpaper to finish off.
I dismounted the tube to put the objective back and walked the scope back up the ladder as before to remount. That night I was anxious to star test. The marine layer was blowing in so I rushed out. I was viewing through clouds and what I saw was flaring of bright stars and a halo around an airy disk. In my panic I interpreted this as a reversed crown -- even though I had put them back in as they had been removed, and the cell appeared to have been undisturbed since Dalton used it. When I removed it, I saw arrows Dalton drew on each element, and the arrows pointed to the sky. Now I wondered if the arrows should point toward each other (the way Edmund Scientific objectives, like my 6-inch f/15, are mounted).
A few days later I remounted the objective, this time with the arrows pointing toward each other. But it was hazy but not clouding, and the seeing was poor, but I could tell this was a mistake: halo around stars, and the moon was soft at focus.
I took everything apart once again and remounted the objective. I realized, from the spacers, this is a Baker achromat. Bakers are similar to Fraunhofer objectives, but with a bit of a wider air space to control color. Like the Fraunhofer, the Baker's crown has one side with a more pronounced convex curve, which faces the flint; the weaker curve faces the sky. Dalton's arrow pointed to the weaker, and I could easily see the difference in the curves. The two elements had a vertical line drawn on them, which I lined up with each other -- I knew this time I was mounting the elements correctly.
Over the next couple of nights, I was able to conduct some star testing and to test the scope on different doubles. Seeing and transparency were poor both nights. I get some flaring from brighter stars, but I think this is due to seeing (and to the increased aperture, meaning they will throw off more diffraction). The Baker design does seem to be more effective controlling color aberrations, I noticed only slight bluish tinge to the moon's limb. I was able to resolve overlapping disks on STF 1937 (currently 0.6" separation mag. 5.6/5.9 double star). STT 296 (2.2" 7.8/9.1) was a lovely clean split. I get airy disks but the diffraction is disturbed by seeing. Solar viewing, masked down to 4-inches, has been incredible -- if only because I'm used to viewing white light and H-alpha at 3-inch aperture.
Something I should have known but was surprised by nonetheless was the narrowness of the FOV. My 31 Nagler gets 105x magnification and only a 0.8-degree TFOV, just enough to squeeze the moon into. My 55mm Plossl (with 67mm adapter) gets 1-degree TFOV and 50x. I have a Surplus Shed 95mm which will get 1.5-degree TFOV. All to say -- I'm thankful my mount has encoders so I can use DSC, otherwise I'd be limited to brighter / easier to find objects. I do have a finder (80ED) but it's far more productive for the observing I want to do to have DSC.
So far so good on the Byers 812, it's handling the weight and moment arm well. I'm not in a rush to up-size the mount, that will be a big project. The mount is 8' high, and for most viewing positions I can be seated -- if anything the mount could be higher to accommodate the long tube at zenith.
For the time being I am calling the scope a success. We won't have good weather for the next week, but I'm hopeful when conditions are good the scope will prove to be fine. I received a Ronchi eyepiece and will use it to inspect the objective when I can. Time will tell!
Update, June 2024:
I decided to take the scope down. The star images were just too poor. I received a Ronchi eyepiece which confirmed the undercorrection I noticed in star testing. And I noticed a strange round breakdown in the Ronchi image. I still suspected some problems with the objective, perhaps spacing of the elements. I needed to have the scope on the ground so I could test it and find out the problems (and maybe fix them) without having to unmount/remount at each iteration.
I reached out to my local astronomy community to see if anyone could help me perform a DPAC. Moshen Chan replied, and he came to my house with his DPAC eyepiece. I equilibrated my flat, the objective, and the tube in my garage for 2 days before the test, and we tested in my garage. Here are the results, with commentary from Moshen:
If it was a smooth optic, it would be 1/5.6 wave overcorrected or .90 Strehl and would be diffraction-limited. The below image shows the simulated image (left) with .90 strehl and the actual DPAC (right). But it has a severe center zone which I try to model next.
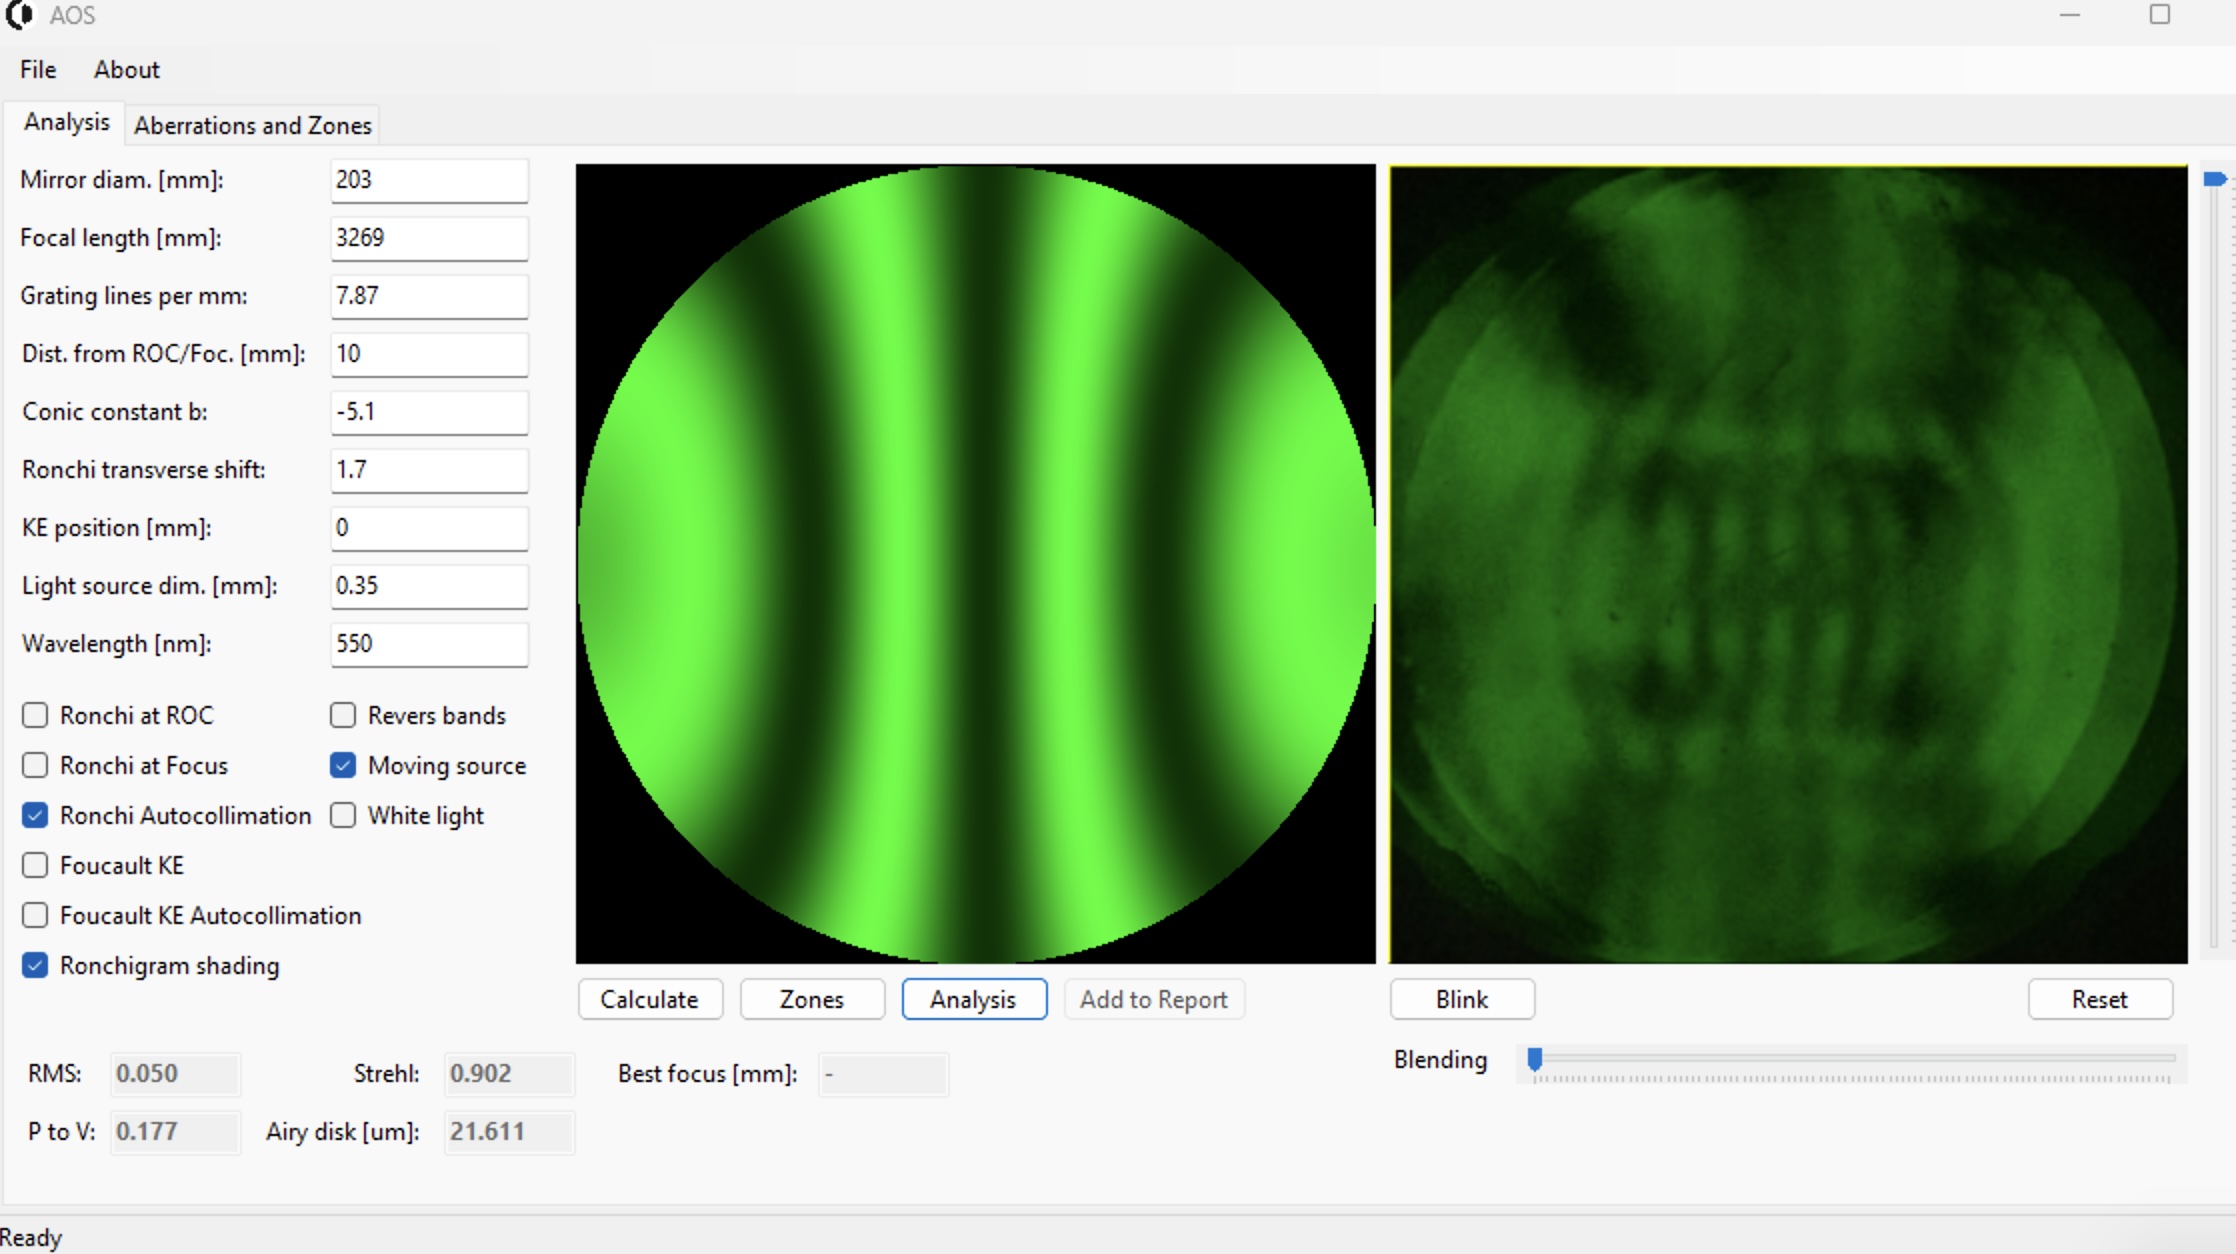
I had a tough time modeling the zone, but in this approximate example, it drops the strehl from .90 to .69, so below diffraction limited.

Here was the best in focus 'knife-edge' I could get. The center zone is evident but I couldn't get the outer area to 'null' out, which seems to indicate some astigmatism or coma.

Here it is masked to 4". The center 3" is well corrected but the outer 1" is sharply overcorrected once it hits the slope of the zone.

The in-focus 'knife-edge' of masked 4" shows a nice flat center and the outer 1" is overcorrected since it hits the area of the zone.

With all the issues, I'm guessing it's below diffraction limited and that would explain why you see a thick outer ring and a second ring in the airy-disk..
The well-corrected 3" center explains why my solar viewing had been so good. But I didn't go through all this effort for a 3" scope!
As a result of all this I've remounted my 6-inch f/15 refractor. I'm setting the Dalton aside. I don't think I will find a hobbyist to refigure it -- I don't want to pay any significant amount of money to repair it. The large cell is very problematic, it is not collimatable and it absorbs too much heat during the day. Instead I will look for a replacement objective which will fit my 10" diameter tube and use that instead.
Sorry for Dalton. Somewhere along the line he wasn't able to get this objective working properly.
Sorry for Dalton. Somewhere along the line he wasn't able to get this objective working properly.
---
Zane suggested I reach out to Jordan Ragsdale, another passionate telescope builder and observer. During the time Zane had the scope, Jordan was interested to find out more about its history and contacted one of Dalton's sons. He received this email back, which he posted on the Antique Telescope Society's iogroup site. Quoting in full (including spelling mistakes):
"Jordan,
This is amazing! Where do I start?? My dad was true to life 'Renaissance Man' - Quiet, Gental, Painter, Musician, Gardener, Writer, Photographer, Builder, Machinist, Craftsman, Stargazer and Loved! my mom. God had given him so many talents that he performed with deep conviction and love. He never went half way, It was always 110%. He studied, contemplated, sketched, contemplated more, executed.
He lived in Brooklyn, studied painting at the 'Art Students League' in NYC and studied to be a concert pianist. Enlisted in the Navy during World War II. My grandfather gave him land next door in CT to build a practice studio for his baby grand piano. Our family grew and the studio turned into our home - room after room, garage & Observatory. I recall helping him hold up the ribs of the dome in the above article. I must have been around 10 or 12 yrs old.
My dad LOVED viewing. He viewed with passion and would view all of the time (weather permitting). He gave me a 3" refractor in the early 70's and he would set me up out in the lawn while he was viewing. Great memories - I loved it. He would take photos of the moon and we would develop them in the dark room he set up. I still have some black and white photos he took. The 6" scope in the article is the one I currently have here in upstate NY. I don't have an observatory, but years ago I set it up in the yard. It needs some TLC at this point. It might be time to find a new home for it.
I recall him traveling to places with groups of armature astronomers to capture certain sky events. I also remember that he was very serious about moving to Flagstaff AZ. Less light pollution? Bigger skies? not sure why we didn't.
The 8" telescope was his labor of love. I recall the glass blanks my dad bought needed to be perfectly round in diameter. My mother worked in the Brookfield Post Office and became friends with someone that worked at Perkin-Elmer company in Danbury CT. This company would build the Hubble mirror. My mother's friend was able to take them and get them machined for him.
My dad set up a 55 gal drum in our TV room - his new lens making room! It seemed to take forever grinding the convex and concave lenses!! Round and round he ground and polished. I remember he made a device that sent light into the lens and it would check how accurate the light rings were in the lens. I don't know the terms, but I remember looking through the peep sight and seeing how the light rings formed on the surface. The lens went back on the drum for more polishing and creating a mess everywhere. : ) Good thing my Mother didn't care about the mess. The result was hopefully outstanding optics. I do remember Saturn was huge.
I will send photos in a separate email. I hope you enjoy the photos. I scanned them from slides with my phone. I also found a drawing in one of the S&T magazines that I have from my dad.
I hope this fills in some of the blanks.
Regards,
Wade Dalton"
---
John Dalton's AAVSO observer code is DLT. He made over 600 observations from 1968-1981, which seem to all be from his 6-inch f/15 refractor. There seem to be no observations from his 8-inch, and I wonder why?
No comments:
Post a Comment